Odds are high that your motorcycle suspension needs tuning. The manufacturer is forced to make compromises in suspension components and settings - even if no expense has been spared in manufacturing, the engineers still have to make assumptions about your weight, preferences and riding style.
Fortunately, most adjustments aren't difficult or expensive and the payback in riding enjoyment and lap times can be substantial.
First, a couple of rules:

The following applies to conventional forks - the principles are the same for upside-down forks but the disassembly and location of components will be different.
The first thing is to get the correct fork spring rate. But what's "correct"? It's a matter of preference, but here are some guidelines:
Adjustments to the front suspension will require supporting the bike so the front wheel is off the ground. I hang mine from the shop ceiling, but most prefer to use a front stand that supports the bike under the steering head.
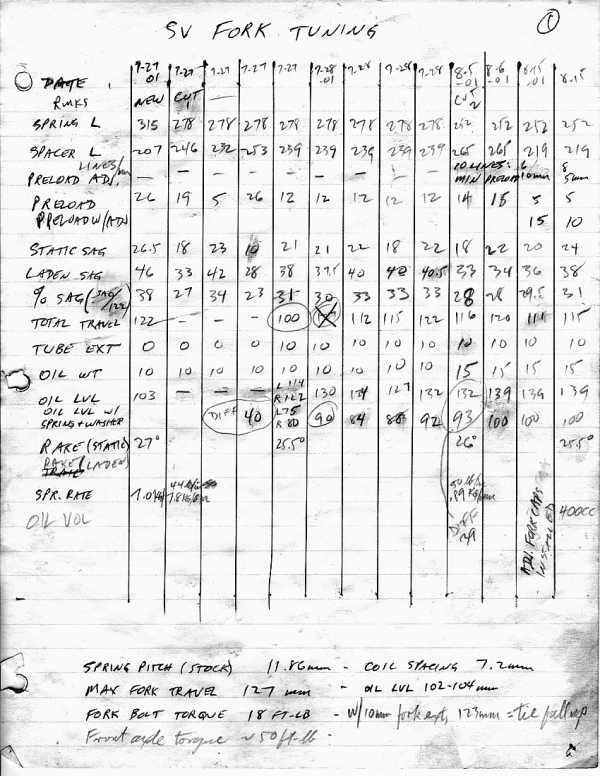
First you'll need to determine the maximum travel of the fork. With the front end supported, remove the fork caps and springs. Measure the distance from the bottom triple clamp to the dust seal on the fork slider. Compress the forks fully and measure again. Record the difference in your log. It's best if these measurements are made in millimeters.
Then replace the springs, spacers (if any) and fork caps. Put a zip tie (plastic cable tie) around the fork tube above the dust seal. Lower the bike so the suspension settles, then raise it again to measure the distance between the seal and the zip tie. This is the static sag. Record it in your log.
Lower it again, having pushed the zip tie against the seal. Sit on the bike gently in normal riding position, then dismount and take the same measurement. This is the first laden sag measurement. Lower it once more, then sit on the bike and compress the forks, slowly releasing the fork pressure until the suspension is stable. Dismount and measure the distance again. This is the second laden sag measurement. The difference is because of stiction in the forks. The average of these measurements is the laden sag. Record it.
Calculate the percent sag: laden sag divided by maximum travel. For sporting street riding I prefer 30 to 33%, most racers seem to like 27-30%. Cruisers might be as high as 40%. Depends on how soft a ride you want. Less sag, stiffer springs, less dive under braking, harsher ride over bumps. Your choice.
Preload will affect sag substantially. I usually start with preload of 10 to 20mm - this is adjusted either with adjustable fork caps or by changing the length of the spacers above the springs. If you need to change spacers, schedule 40 PVC plastic plumbing pipe is an excellent choice. It's strong, cheap and easy to cut. I use 1/2" PVC in my RD and RZ, 1" in my SV.
If you can't get the desired sag with a modest amount of preload, you'll need to change the spring rate. I'm assuming that your springs are too soft in the following discussion.
If your suspension is too soft you can either buy aftermarket springs or cut your stock ones. But first you should find out what you're starting with.
Spring rate is measured in lb/in or kg/mm. It's just what it sounds like: the amount of force (weight) that will compress the spring a given amount. Straight-rate springs have a constant rate - if 100 pounds will compress them one inch, then 200 pounds will compress them two inches. Progressive springs are wound with different pitch at different points on the spring and are softer at the beginning of compression, stiffening up as the closer-spaced springs compress and bind. At full compression the closer coils will usually be fully bound and the wider ones will be the only springing, hence the spring rate is higher. Some springs are dual-rate - not progressively wound, just two springs of different rates in series. Here's an example.
To measure a spring you just push it down on a scale. I use a cheap bathroom scale. I put a rod through the center of the spring to keep it straight and use a steel crossbar on the top of the spring to give me something to grab. You first push it down until the scale reads, say, 10 pounds. Measure the length of the spring at this point. Then press it down until it reads 110 pounds, for example. Measure this length. The rate is the difference in weight divided by the difference in length. To convert from lb/in to kg/mm divide the reading by 56.
Aftermarket springs are available from several sources, I guess Progressive Suspension is the most popular. If you're buying springs you'll need to know what you have, as above, so you'll know what to order. An increase in spring rate of 10% is substantial.
On my SV650 I increased the rate from .70 kg/mm to .89 kg/mm - this is a pretty large change, but the bike was rather soft to begin with and at the time I weighed 240 pounds. SV650 racers I've talked to say that .9 kg/mm is good on the track for somewhat lighter riders.
I'm cheap - rather than buy springs I prefer to shorten the originals. That's right, shortening a spring makes it stiffer. Many people don't believe it, but it's true.
Take a look at my suspension
log - you'll see that the stock spring length was 315mm, which I
cut
to 278mm as a first try. This changed the stock .70 kg/mm spring to .78
kg/mm. Naturally I had to make up for the missing length by making the
spacer 37mm longer. As you'll see from the log, I made 8 different
adjustments before deciding I wanted a yet stiffer spring. In
column 10 you'll see I cut the spring further, to 252mm (again, with a
longer spacer) for a rate of .89
kg/mm.
I cut my springs by guessing and measuring. After I'd described my
experiments, Mike Craig posted an excellent discussion of the
calculations involved: spring_rate.html.
Don't try to cut springs with a hack saw. The spring is too hard. The easiest tool is an angle grinder - I used a 4" angle grinder to cut off a few coils, then a torch to heat the last coil so it could be collapsed. I used an oxyacetylene torch, but a propane or MAPP torch will work - get the coil red hot, then squeeze it with pliers. Once it's collapsed, grind it flat with a grinding wheel. It's important to make the end as flat and square as you can so the spring will push straight.
Once you have your springs cut, reassemble the suspension and take sag measurements again, adjusting preload until you get sag into the desired range. Don't forget, take test rides.
We've all seen cars with bad shocks, pogoing their way down the freeway. A wheel hits a bump and compresses, then rebounds, then re-rebounds, maybe as many as three or four times. This is oscillation and it can make a car (or a bike) nearly impossible to control.
This is where shocks (or, more correctly, spring dampers) come in. The damper is partially filled with oil which is forced through small orifices when the fork (or rear shock) compresses and rebounds. The friction of the oil through these passages retards the movement of the suspension, taking energy from the spring and transferring it to the oil as heat.
You can get a feel for good damping by bouncing on the seat of a well-set-up sportbike, motocrosser or racebike. Bounce on the seat and stand up immediately - you'll feel the bike rise quickly to almost full height, then slow down the last bit of travel. Often you can feel the same thing when compressing the forks. That's damping in action.
The amount of damping is dependent on the weight of the oil and the size of the damping holes. Many street bikes are underdamped and can benefit from slightly heavier oil - but it's easy to go too far. If you've changed the oil and now find you've got a harsh ride over sharp bumps, you've probably gone too far.
One point is often overlooked: stiffer springs need stiffer damping. When I raised the spring rate on my SV I found the 10W oil wasn't damping enough, and a change to 15W made a noticeable difference.
High end forks and shocks as found on some sportbikes have adjustments for compression and rebound damping. These will allow fine tuning, but they're useless unless you have the right weight oil to start with.
For cheaper forks that don't have damping adjustments, there's the Race Tech Cartridge Emulator. More on that below.
The fork oil's primary function is to be pushed through small holes to damp the rebound of the spring. In an automotive shock, this is the only function of the oil.
However, in a bike fork there is the spring, the oil, and the trapped air above the oil.
This air is important - air, when compressed, acts like a spring, but with a rising rate. That is, the more it's compressed the more force it takes to compress it a bit more. Most fork springs, on the other hand, are linear (straight rate).
The idea is to set the oil level so that the right amount of air is trapped to keep the forks from solid metal contact at full compression. (Obviously, bottoming the fork internals leads to a harsh ride and component damage.) The right amount of oil will allow nearly all of the fork travel to be used in riding and stopping.
How do you find out what's needed?
First, with the cap and spring out of the fork, find out what the maximum travel is (when the fork internals bottom out). Then reassemble the forks and install the recommended amount of oil.
Second, once the forks are on the bike, take a zip tie (plastic cable tie) and put it around the fork tube above the slider - make it tight enough that it'll stay where it's pushed by the slider's dust cap.
Third, go for a ride. Do some hard stops with the front brake. Do stoppies if you can.
Fourth, back in the shop, compare the position of the zip tie with the previously measured maximum travel. I like to get the working travel to within 1/4 inch of maximum.
If the working travel is too little, remove a bit of oil.
If it's near or equal to the max, add some.
The best way to do this is to remove the fork springs (support the front end first) and measure the oil level in each leg with the forks totally compressed.
Measure the distance from the top of the tube to the oil level. If you want to make changes, I'd suggest a level change of no more than 10mm at a time.
It's hopeless to try to measure oil volume accurately once it's in the forks, that's why we measure level instead.
Here's an example:
Take a look at my SV650's log - you'll see in column 7 I set the oil level at 124mm, which yielded a total travel of 112mm, 10mm short of the target of 122mm. In column 8 I reduced it to 127mm, for a total travel of 115mm. In column 9, I dropped it further to 132mm, which produced travel of 122mm. Right on target.
Then in column 10 I cut the springs to make them stiffer yet and started over.
Oh, yeah: you should leave the zip tie on the fork leg. It will tell you if your travel changes, which will happen if you lose any fork oil... and anyway, it lets the cognoscenti know you're hip! Almost as good as tiny rubber balls on the edges of your tires.
Conventional damper-rod forks provide spring damping by forcing oil through holes in a damper rod, located inside the fork tube. The problem with this arrangement is that the resistance of oil forced through these holes varies as the square of the velocity of the oil. Which means the damping can be set up just right for slow bumps but will nearly lock up over sharp ones. This phenomenon can't be detected by bouncing on the bike, but it's obvious when riding on a rough road.
Damping can be adjusted by varying oil weight, but that doesn't help with the sharp bumps.
Manufacturers of high-end forks solved this problem by eliminating the holes. Cartridge forks feature one-way valves comprised of a stack of shims held closed by a spring. Fork compression forces oil past these shims against the force of the spring - the amount of damping is determined by the number of the shims lifted off their seats by the oil pressure. Cartridge forks can be adjusted for good low- and high-speed damping.
For bikes (like my SV650) with damper-rod forks, there's a solution. Race Tech makes the Cartridge Emulator, which has a shim stack and spring just like in a cartridge fork. The original compression damping holes are drilled out to a much larger size, so they don't do anything, and compression damping is handled by the shim stack and its spring. The cartridge emulator sits on top of the damper rod, inside the fork tube.
Cartridge emulators have two advantages: improved high-speed compression damping, and the separation of compression and rebound damping adjustments. Rebound damping is set simply by changing the weight of the fork oil (same damping holes for rebound), then the compression damping is set by adjusting the spring on the shim stack.
This allows stiffer rebound damping with softer compression damping - which, as mentioned, works for both low and high speed bumps.
Race Tech Cartridge Emulators are Recommended by Strappe.
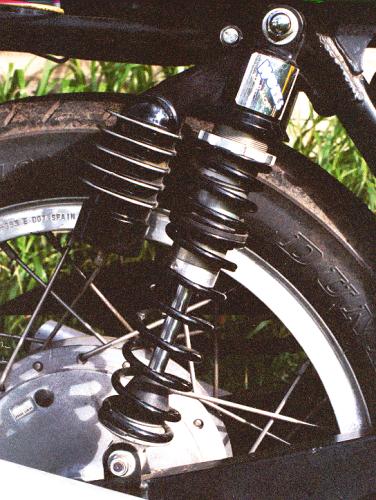
The same principles apply to the rear suspension, but we can't usually do much about rear shocks. Expensive ones have adjustments for preload, compression and rebound damping, and sometimes ride height. Cheap ones have only preload adjustments. If you have a high-end shock, you can adjust compression and rebound damping - usually you'll want fairly soft compression damping and stiffer rebound damping.
Preload adjustment is good for small changes in spring stiffness, but no substitute for selection of the right spring rate. It's desirable to have similar suspension behavior front and rear, so your rear sag percent should be about the same as the front.
Wimpy springs and shocks (as delivered on lots of new bikes) usually can't be successfully modified, so the solution is purchase of an aftermarket shock. These can be pretty pricey, in the $500 to $800US range.
Sometimes you can fit a replacement from another bike - for example, I tossed the shock on my SV and installed one from a GSXR750 which is rebuildable and has adjustable compression and rebound damping. A worthwhile change for about $200 including a new spring.